Sep 23, 2014

Behind The Image of a Newly Discovered Boston Skyline Photo Location

http://juergen-roth.artistwebsites.com/featured/amazing-boston-juergen-roth.html

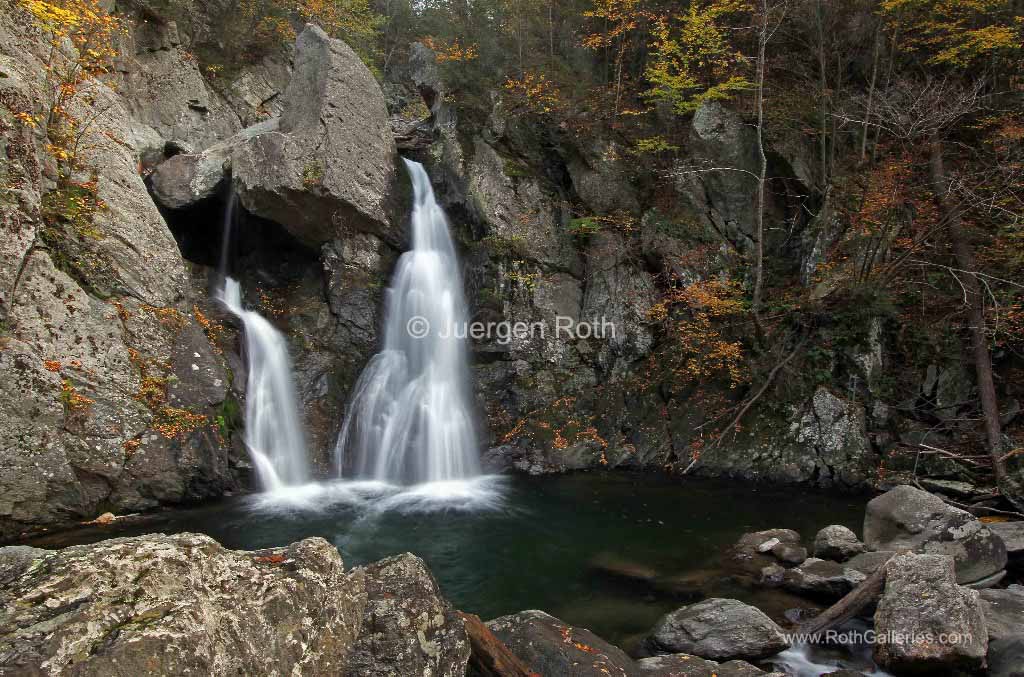
On the way home from my last photo tour to Rockport, MA I discovered a new location for Boston skyline photography. While driving home I noticed a spot that may have potential and I instantly decided to get off the highway at the next exit and to explore  this photo opportunity. Upon arrival at the potential area I got out of the car, walked around and looked for any open views through tree line that would allow to photograph some of Boston’s iconic landmarks. So glad I made that decision and scouted the area as the view was somewhat unique as it shows the Tobin Bridge with the Zakim Bridge, John Hancock Tower and Prudential Center. I have not come across a Boston photo like this and continued and was pumped to make my way back as soon as possible. That evening I went back to explore the twilight angle of the vista. I composed the photo image so that the highway and Tobin Bridge lead into the City of Boston. My 70-200mm zoom lens with a 1.4 telezoom converter allowed to comfortably zooming in for a more intimate skyline composition. The weather somewhat cooperated and it was a beautiful sunset night. I picked a small aperture (f/16 or larger) to achieve long exposure setting of 20 plus seconds at ISO100 and ISO200. These settings ensured that the incoming car traffic to Boston and rear car lights were captured in red streaks while the outgoing Boston traffic and headlights showed in white streaks in the photograph. One tricky part that needed timing and tweaking of camera settings was the on ramp traffic onto the Tobin Bridge. I envisioned a red traffic streak there as well and it took multiple attempts to capture in this final picture. Funny part to the entire story: although I thought I found a unique photo location, 10 minutes after I set up another photographer showed up and he mentioned that he saw pictures of a friend with that view. Apparently it is not as unique and exotic as I hoped but I still love the location and I will be back on a clear night to incorporate the twilight blues into the next Boston photography composition.

During post processing I followed my routine digital flow and cleaned up dust spots, adjusted lighting, contrast and color saturation before sharpening the final image of Amazing Boston.

Good light and happy photo making!

Juergen

Sep 17, 2014

Improve your Seascape and Landscape Photography

http://www.rothgalleries.com/

Incorporate an interesting foreground feature into your picture composition that will lead a viewer into the photography image. Anything goes: boulders peaking out of the water, colorful fall foliage on the ground or a branch, part of a picturesque fence, a scenic brook, a beautiful water reflection or simple Driftwood on a Beach are only a few examples that you should look out for next time you are out and about. 

Good light and happy photo making!  

Juergen

Subscribe to My Newsletter
Like Me on Facebook
Buy my Photo Art
Image Licensing

Sep 16, 2014

The Summer of Sunsets in New England

http://juergen-roth.artistwebsites.com/featured/boston-sunset-juergen-roth.html

New England and Boston have been blessed with a beautiful summer this year. It was not too hot and temperatures were tolerable for the most of the times and most to my liking. In recent days there is talk that fall has already arrived upon us and I have to admit: it's a bit cool for the time of the year. On the flip side there have been plenty of low and thin clouds that make the heart of New England photographers and nature admires go faster!

After photographing Lightning and Thunder over Boston last week, I went back to the same location. I always call the upper deck of the Museum of Science parking garage one of the best photo locations in town. It has indeed a marvelous view of the popular skyline and it is very convenient. It takes me 15 minutes max to get there from my house and often is my go to location if I am uninspired by anything else. That day I was listening to my weather friends from WBZ Weather Front which were forecasting another evening of low and thin clouds. They even pointed out that Bostonians and New Englanders were in for another amazing sunset treat, a spectacle not to be missed for photographers and nature lovers alike. After my usual routine of setting up tripod and camera I patiently waited for the magic to unfold. The action started after probably waiting for 15-20 minutes on location. I always love when the sky slowly turns from white and greyish clouds to orange to pink and deep red in a few minutes. At the time I had my lens equipped with a split neutral density filter as I anticipated that I had to overcome the strong contrast of the bright sky and the darker foreground of the Charles River and Longfellow Bridge. A small aperture of f/22 at ISO100 provided an exposure time of 2.5 seconds. The solid tripod ensured a stable set up that eliminates some of the many photography variables and getting us closer to consistently creating sharp and high quality Boston skyline pictures.

During post processing I removed dust spots, minimally adjusted lighting, contrast and color saturation before sharpening the final image of Boston Sunset.

Good light and happy photo making!

Juergen
Like Me
Buy my Artwork
Image Licensing

Sep 12, 2014

I wonder what it is like to be a Rainmaker

http://juergen-roth.artistwebsites.com/featured/when-the-lightning-strikes-juergen-roth.html

A week ago severe thunderstorms ripped through New England and Boston from late afternoon into the night. I always wanted to photograph the Boston Skyline at twilight with lightning flashes and saw great potential to finally capture my vision in a photo. Approximately an hour before nightfall I made my way over to the Museum of Science parking location. The upper parking deck is a fabulous skyline photo location at all times and I figured if I pick the one beneath I would be safe, dry and still get a decent view of the city. Turned out I was pretty much right. Upon arrival I set up tripod and camera a few feet away from the building edge so rain would hit my lens. A Canon 28-70 zoom lens allowed for some compositional flexibility and all what was left was patiently waiting for the lightning show to start. It didn’t take long when the sky turned completely dark and the lightning and thunder rolled in. I immediately started shooting but it was a bit dicey when the storm unfolded right above me. A couple of times I crawled back into the car because lightning was followed by immediate thunder and I was worried I may get hit while pushing my luck a bit too much. 

http://juergenroth.photoshelter.com/gallery-image/Boston/G00003cWcZlgWzHI/I0000hP9.tH9CeQk 

When the first storm front finally made it's way passed Boston, a second was unfolding at the horizon, probably across Wellesley, Newton, Natick, Framingham areas. Instead of leaving I therefore stayed around and boy was it worth it! The second front passed by further south exactly behind the skyline with its famous landmarks like the John Hancock building, Prudential Center and Boston brownstones that line the Charles River. With the heavy rain gone and the storm far away I was in the clear. I moved tripod and camera closer the building edge for a more unobstructed view, recomposed the picture and kept shooting. In the meantime twilight arrived which allowed me to capture the image that I originally envisioned. It was awesome too watch and a few minutes after twilight I was able to capture a couple more dramatic storm pictures over Boston.

http://juergen-roth.artistwebsites.com/featured/boston-lightning-thunderstorm-juergen-roth.html 

During post processing I followed my routine digital workflow of dust removal, minimal lighting, contrast and color saturation adjustments before sharpening the final images of Electric Boston, Boston Lightning Thunderstorm, and When Lightning Strikes.

Good light and happy photo making!

Juergen
Like Me
Buy my Artwork
Image Licensing


Sep 11, 2014

Caring for your Photography Prints

http://www.exploringthelight.com/

In my first 3 blog posts of this series we discussed how to protect and clean Acrylic Prints, Aluminum Metal Prints and Canvas Prints. In this weeks' last installment we will be discussing how to care for photo prints.  

Museum-quality photography prints are created on acid-free papers with archival inks to guarantee that your prints last a lifetime without fading or loss of color. Matte  paper is long-lasting and versatile. It's ideal for high contrast and crisp reproductions. Glossy finish shows off your photo art with luxuriant depth and vivid colors. 

Beautifully matted and framed fine art photography makes for a great and elegant Interior Design Solution in public areas such as hotel, sports bar, restaurant, lobbies of all kinds and studio settings. Photo prints are also a traditional decoration choice for doctor, dentist and lawyer offices and truly make for spectacular personal gifts. With proper care, photography prints will last for years, so you can fully enjoy and appreciate the artwork for many years to come: 

http://www.exploringthelight.com/


1. Dust your photo print with a clean, soft cloth to prevent dust buildup. Do not wipe dust spots of with your fingers as it will be very abrasive and scratchy to the surface of your Photography Art.


2. Do not use any cleaning products or water since the chemicals may permanently damage your photography prints.


3. Avoid blowing on your print because you may inadvertently leave water droplets and marks on your photography print.


http://www.exploringthelight.com/ 
4. Keep your photo print out of direct sunlight because sunlight may fade or crack your Photography Prints. Consider rotating prints in direct sunlight location to minimize impact.  

5. Note that ultraviolet light from many fluorescent lamps may cause damage to your photo prints due to alteration of the chemical molecule bonds in inks and chemicals used in the printing process.


6. Do not exhibit your photo print in areas where dust and pollutants are dominant as those conditions may lead to damage in form of discoloration, i.e. cigarette smoke, motor exhausts, smog, fresh paint.


http://www.exploringthelight.com/ 
7. Avoid hanging your photo art in places with great fluctuations in moisture and temperature as it may enhance growth of mold and mildew resulting in significant damage or total loss of your fine art photography investment.  Do not hang you artwork above heaters or fireplaces.


8. Avoid touching the surface of your art print with your hand or fingers because the oils in the skin can cause long term damage.

http://www.exploringthelight.com/

Good Light and happy photo making!

Juergen

Sep 7, 2014

MR 20! Message on Boston Prudential Center

www.rothgalleries.com

On my way home from a Boston Skyline Photography shoot on 06 September 2014 I noticed the Prudential Center being lit up with the message MR 20! when I crossed over the BU bridge. I was quite puzzled by it but immediately decided to stop and capture it in a photograph. It is a familar location that I often frequent when looking to photograph the full moon across the city or Boston at sunrise. I therefore already knew what to expect and how to compose a pleasing photo of Boston with the message on The Pru. I took my time setting up tripod, camera and picked my Canon 70-200mm lens since it allowed for most framing flexibility. I first zoomed in closer at about 200 mm to achieve a more intimating composition of the Prudential Center and 111 Huntington Avenue buildings. The second image at approximately 70 mm focal length allowed for a more open skyline view that included the John Hancock Tower and Citgo sign. Many people asked if I knew what Mister Twenty stood for but I had no idea. I figured there was a concert going on but turns out the Red Sox were in late innings. When I finally made it home I searched the meaning of the mysterious message and turns out it was in honor of Malcolm Rogers, a British-born, American curator and current art director of the Museum of Fine Arts Boston. He is retiring after 20 years. I applaud the folks from The Pru - what a great gesture! 

http://juergenroth.photoshelter.com/gallery/Boston/G00003cWcZlgWzHI/

Good light and happy photo making!

Sep 3, 2014

Fall Foliage and Autumn Photography Tips

www.rothgalleries.com

New England autumn colors are famous throughout the world. Leaf peepers and photographers alike flog to the Northeast of the United States of America to experience the marvelous fall foliage glory in Acadia National Park and State Parks of Maine, Rode Island, Connecticut, Massachusetts and Vermont. New York State to the west and the Great Smokey Mountains further down east are 2 more fabulous destination for fall foliage leaf peeping and autumn photography. This blog post compiles 11 photo tips for better fall foliage photography results. The photo hints discuss how to capture mood and color of this spectacular season and bring home beautiful photography impressions and memories. The pictures and links provide further tutorials that may be of interest ... hope you explore and enjoy!

Photo Tip #1: Plan your New England leaf peeping or
fall foliage photography trip well ahead of time this year. There are many sites that provide the required information but The Foliage Network is one of the best and this website provides accurate foliage reports for color and leaf drop. In my experience "High Color" is the preferred time to find these glorious New England fall colors.


Photo Tip #2: Get out after a rain storm has passed to take advantage of beautiful lighting conditions when the sunlight breaks through and provides spectacular lighting condition. The air is clearest in the morning and after rain storms making for good times to strive for stunning and scenic autumn landscape photography compositions. 

Photo Tip #3: Do not be fooled and discouraged by an overcast and rainy day weather forecast. Cloudy days provides beautiful and well balanced light that enhances details in darker areas. Rain drops on leaves make for excellent macro photography images and wet leaves turn the leaves on fire. Eliminate overcast sky by using your telephoto lens to achieve a tighter, more Intimate Landscape composition that is more beneficial and interesting.


Photo Tip #4: A Polarizing Filter is a good tool to boost color and balance the contrast in your photography image. The filter eliminates unwanted glare and reflections on wet leaves that may distract from the composition. Think of it as sunglasses for your camera. Overall, these filters increase color saturation, boost blue sky, add cloud contrast, control reflections and add neutral density to lengthen exposure times for blurred, impressionistic images. 

www.rothgalleries.com 

Photo Tip #5: Low ISO settings like ISO 100 and below make for higher quality pictures. Do not use your camera Auto ISO setting since at low light conditions it will adjust to higher ISO settings that produces more noise. Instead get into the habit of using your tripod even when sufficient light is available. 

Photo Tip #6: Look for warm autumn hues and combine them with their complementary colors for high color contrast imagery; For example golden, yellow or orange foliage combined with a saturated blue sky. Red maple leaves work well with an evergreen background, all making for fabulous autumn images.


Photo Tip #7: Find inspiration in waterfalls framed by beautiful foliage colors or get close with still tree leaves on the ground and on rocks in rushing creeks and brooks. Overcast and cloudy sky provides excellent conditions for such photo objects. 

www.rothgalleries.com

Photo Tip #8: Photograph during the morning or afternoon when light is at its best and leaves are sun-kissed by the beautiful sunlight thereby illuminating the colors of fall foliage. 

Photo Tip #9: Capture beautiful autumn, razor sharp and Mirror-Like Reflections in ponds and lakes. Too windy for that ... no problem, create artistic impressionistic images within the tiny waves or with foliage in motion.

 www.rothgalleries.com

Photo Tip #10: Saturate and intensify colors by underexposing your photos slightly. 

Photo Tip #11: Do not ditch November and December when leaves are on the ground and make for beautiful Macro Photography pictures. Visit your local sites to get in close and extend fall foliage photography season for a couple of months.

www.rothgalleries.com


Good light and happy photo making!

Juergen


Sep 1, 2014

12 Hour Labor Day Flash Sale - Discount Coupon Code: AYZDMN

http://www.rothgalleries.com/

Please use coupon code AYZDMN when making a photography art purchase of any canvas, metal, acrylic or standard photo print at Roth Galleries for a whopping discount today. 

Act now - limited amount of coupons and valid until midnight today! 

Good light and happy photo making!  

Juergen

Like Me
Buy my Artwork