Sep 30, 2012

Das Foto of the Week

Every week I choose one of my favorite photographs of the week from my Fine Art landscape, cityscape, flower and macro photography collection and offer it throughout that week at a discounted rate. This week's photo of the week on sale is Abstract Tree Reflection displaying beautiful fall foliage photography artwork from Maine Acadia National Park.

Starting today through the week of 01 October 2012 this abstract autumn foliage reflection photo image from my Acadia National Park Gallery, available as art print, acrylic print, metal print or on canvas, is on sale.

11 Tips for Better Fall Foliage Photos


The fall foliage colors of New England are famous throughout the world. Visitors flog to the Northeast of the USA from all over the world to experience the marvelous autumn glory in Acadia National Park and State Parks of Maine, Rode Island, Connecticut, Massachusetts and Vermont. New York State to the west and the Great Smokey Mountains further down east are 2 more prime destination for fall foliage peeping and photography. I compiled 15 photo hints and tips for fall foliage photography using digital and film cameras. The photo tips discuss how to capture the mood, the color, the season, how to make colors more intense and how to photograph  glorious fall foliage photos with our photography gear and bring home beautiful photography artwork memories ... pictures and links provide further tutorials ... hope you explore and enjoy!

Photo Tip #1: Plan your New England fall foliage leaf peeping or photography trips well in advance this year and at peak times. There are many sites that provide the required information. The Foliage Network is one of the best and this website provides accurate foliage reports for color and leaf drop. "High Color" is the best time to find these glorious New England fall colors.

Photo Tip #2: Get out after a rain storm has passed to take advantage of beautiful lighting conditions when the sunlight breaks through and provides us with spectacular lighting conditions on fall foliage. Air is clearest in the morning and after rain storms making for good times to strive for stunning and scenic autumn landscape photography compositions. 

Photo Tip #3: Do not be fooled and discouraged by overcast and rainy day weather forecasts. Cloudy days make for beautiful balanced light and provide us photographers with minimal wind and beautiful light to capture sharp details in leaves and trunks. Rain drops on leaves make for excellent macro photography images and wet leaves bring out colors even more. Eliminate overcast sky by using your telephoto lens to achieve tighter, more Intimate Landscape compositions that are more beneficial and interesting.
 

Photo Tip #4: A Polarizing Filter is a good tool to boost color and balance the contrast in your photography image. The filter eliminates unwanted glare and reflections on wet leaves that may distract from the composition. Think of it as sunglasses for your camera. Overall, these filters increase color saturation, boost blue sky, add cloud contrast, control reflections and add neutral density to lengthen exposure times for blurred, impressionistic images. 

Photo Tip #5: Low ISO settings like ISO 100 and below make for higher quality pictures. Do not use your camera Auto ISO setting since at low light conditions it will adjust to higher ISO settings that produces more noise. Instead get in the habit of using your tripod even when sufficient light is available. 

Photo Tip #6: Look for warm autumn hues and combine them with their complementary colors for high color contrast imagery; For example golden, yellow or orange foliage combined with a saturated blue sky. Red maple leaves work well with an evergreen background, all making for fabulous autumn images.
 

Photo Tip #7: Find inspiration in waterfalls framed by beautiful foliage colors or get close with still tree leaves on the ground and on rocks in rushing creeks and brooks. Overcast and cloudy sky provides excellent conditions for such photo objects. 

Photo Tip #8: Photograph during the morning or afternoon sunlight when light is at its best and leaves are sun-kissed by the beautiful sunlight thereby illuminating the colors of fall foliage. 

Photo Tip #9: Capture beautiful autumn, razor sharp and Mirror-Like Reflections in ponds and lakes. Too windy for that ... no problem, create artistic impressionistic images within the tiny waves or with foliage in motion.


Photo Tip #10: Saturate and intensify colors by underexposing your photos slightly. 

Photo Tip #11: Do not ditch November and December when leaves are on the ground and make for beautiful Macro Photography pictures. Visit your local sites to get in close and extend fall foliage photography season for a couple of months.


Sep 25, 2012

Picturesque Maine Portland Head Lighthouse

Historic Portland Head Light is one of the prime New England Lighthouses located on beautiful Cape Elizabeth in Maine. The headlight always makes for a great lighthouse photography subject at any time of the day, 365 days a year. The other week we visited family in Portland Maine and had a blast visiting the PMA where we discovered the beautiful paintings and art by Mildred Giddings Burrage. On a side trip between lunch and dinner I stopped by the lighthouse to try out my new neutral density filter. I was hoping the up to 8 stop ND filter would slow down the shutter speed and allow for some silky water photography during mid afternoon. The filter did not disappoint and I achieved 1 to 4 second exposure times at a sunny to partly cloudy day. Setting a small aperture (large f-stop setting) maximized Depth of Field and a desired slow shutter speed. Equipped with my tripod I composed the image to feature the rocky shoreline below the lighthouse and have most lighthouse buildings within the picture. At ISO100, an aperture of f/22 and in combination with the neutral density filter resulted in an Exposure time of 2.5 seconds. During post processing I removed dust spots, minimally adjusted contrast, lighting and color saturation before sharpening the image. 

Sep 22, 2012

Best Photo Location for Boston Skyline Photography

Post sunset is one of my favorite times to take photographs; this applies to landscape as well as city skyline Photography. I regularly go out and capture the Boston City Skyline at twilight on days that I am not occupied hunting for nature photographs. The best time is 20 to 30 minutes after the sun has set. The optimum light and magic of twilight does not last long. Because twilight is hard to predict I set up my tripod and camera prior to the actual sunset and then fire away once the sun sets and disappears. This approach requires sufficient battery power and flash card memory to keep shooting while closing in on the optimum light. The Twilight Effect also works on cloudy days and really long exposure times are not unusual.

Besides Memorial Drive, one of the best locations is the parking garage of Boston Science museum. It is one of my favorite locations and I love to see the sunlight fade and the city lights come to life. This day I went straight to work and kept on photographing the City Skyline of Boston while the sun was setting and disappearing. I included in the composition the skyline reflections and such Boston landmarks as the Longfellow Bridge, Prudential Center, John Hancock building and placed the Charlesgate Yacht Club as a foreground feature. The exposure of the photograph was timed to to coincide with the Boston T subway crossing over the Longfellow Bridge. At ISO 100, the aperture was set to f/4.5 resulting in a 10 second exposure time. In the post processing steps I removed dust spots, minimally adjusted lighting and color saturation before sharpening. 

Want to learn more? I compiled 15 cityscape photography tips for capturing City Skyline Images.


Sep 18, 2012

6 Basic Photo Tips that will Boost Your Photography Confidence and Output


Use the following simple 6 basic photo tips to catapult your photography to the next level and build your confidence. These 6 easy to apply points will provide you the biggest bang for the buck … love to hear your feedback!


Photo Tip #1: Utilize the Rule of Thirds as a Starting Point for Your Composition

Don't use the Rule of Thirds as a set rule; more as a guideline or starting point for a more interesting and 
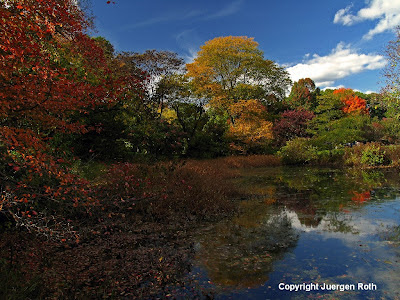
pleasing photographic composition. In Landscape Photography it is best to place the horizon in accordance to the importance of the sky; with dramatic sky formations placing the horizon in the lower third will give the sky more preference, for images with stronger foregrounds and weaker cloud or sky formations a horizon in the upper third of the image is more preferred. Usually locating the horizon in the middle makes a photo ordinary and static. An exception to the just said would be a grand landscape lake reflection. It is easy to apply the same approach to Flower Photography where laying the focus or point of interest within the flower at one of the four intersections has great impact by leaving room for the viewer to explore the image but also to be drawn back to the focus point.


Photo Tip #2: Apply the appropriate Depth of Field to your Photograph

Depth of Field or DoF relates to the parts of a photograph that are in full focus and show acceptable details. We, as photographers, have control over the amount of depth of field in a photograph and depending on our photographic or artistic goals we may vary 1 or all of the 4 factors that determine a shallow or extensive depth of field: Focal Length, Subject Distance or Magnification, Choice of Focus Point, Aperture or f-stop camera setting >>> Learn More.

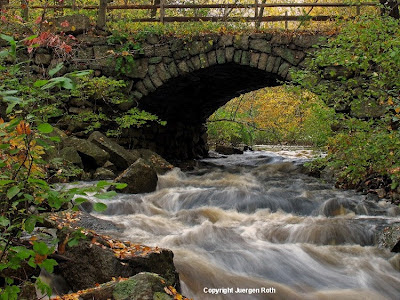
Photo Tip #3: Use a Sturdy Tripod for Better Sharpness and Higher Picture Quality

Besides cameras and lenses, a solid tripod is one of the most important investments for a nature photographer. High quality nature photography is rarely achieved when hand holding your camera. A tripod is essential for low light photography during the morning, evening and twilight, for shooting wildlife, for macro photography and for experimenting with impressionistic or abstract photography. It not only steadies your shooting equipment for maximum image quality, it also will help you discover the world of photography. You are more likely to step back, think and compose a photograph. Prior to shutter release one should always ask yourself: do I have a straight horizon, do I have sufficient depth of field or shall I close the camera aperture setting to maximize depth of field, how will this setting impact my photograph, are there distracting elements in the foreground or background of my composition, do I even have a composition?


Photo Tip #4: Set up your Camera for Exposure Bracketing

Exposure is one of the most important camera and lens functions that a photographer needs to understand and master when pursuing photography. A correct exposed photograph conveys an image of clarity that retains details and colors in all areas of interest including light or dark areas. Correct exposure is always subjective and while I prefer a slightly underexposed image that boosts colors and saturation, others may not.
Correct exposure is a fine combination of ISO, shutter speed, aperture and lens settings. Understanding how these 4 elements come together is crucial for exceptional photography.
One way to evaluate correct exposure is the use of a histogram. With the help of the histogram we can determine and easily check for a correct exposure and adjust accordingly. Understanding a histogram may be overwhelming for some and there is an easier way to study and understand the impact of the 4 elements on exposure. Check your camera manual and set it up for exposure bracketing. 1 stop or even 2 stop brackets will do to study the impact. Exposure bracketing will allow for the camera to record 3 photos each time you take a picture. Start out by choosing a 1 stop bracket. The first picture will be taken at the base setting, the second photo will be under exposed by 1 stop and the third will be over exposed by 1 stop. Not happy with your results, close down the gap to 1/3 or 2/3 stops and retake the photograph. Digital photography is a great learning tool because mega pixels are free and a hands-on approach always works better than all the theory in the world. During post processing one can select the best exposure in accordance to the personal experience and scenery.
I almost always photograph in Aperture Priority Mode and at my lowest ISO setting which then provides me with the appropriate exposure time. Since I usually use a tripod I do not need to worry about slow exposure times. In more difficult lighting conditions I select exposure bracketing to ensure I achieve a correct exposure >>> Learn More.   


Photo Tip #5: Shoot, shoot, shoot and Turn Home Field to Your Advantage

Explore your local gardens, parks, wildlife sanctuaries or nearby National Parks to work and enhance your photography skills. Once perfected locally one can pursue nature photography out of the comfort zone and away from home. Invest the saved money into a sturdy tripod and higher quality lenses. Keep shooting and practicing at your own pace and time, allow errors and learn from them; be inspired by others and develop your own photographic style. Learning by doing is key and learning not only from our mistakes but also from our successes is very beneficial as it is in every other job and industry >>> Learn More.

Photo Tip #6: Take Advantage of Exceptional Lighting Condition

Photography is often referred to as painting with light.  When we talk about painting with light we talk about the process of creating a photograph.  Photography derives from the Greek where photo means light and graph stands for painting.  It is up to us photographers to evaluate the quality, quantity, direction and how we can manipulate light to our advantage for exceptional photography >>> Learn More.


Sep 15, 2012

Maine Acadia National Park Seacoast Photography

I am always on the lookout for more New England Photos. During my last photography tour to magical Acadia National Park in Maine on Mount Desert Island I decided to capture Otter Cliff. The weather was playing along nicely and it was a beautiful, spectacular sunny morning with fantastic lighting ... everything a photog and outdoor enthusiast can wish for! Witnessing a sunrise is always very special but becomes magical in Acadia National Park. This time I was destined to capture one of these moments with my camera and made my way out to Monument Cove in the early wee hours. I was one with nature and deer were greeting me along the scenic park loop road. I figured somewhere in the woods a moose, black bear or an owl must watch me pass by.

Above and around Monument Cove is a pristine photo location to capture the granite rocky seacoast. The destination provides magnificent views of the Atlantic Ocean and the beautiful seacoast that Maine has to offer. Capturing grand coastline and ocean seascape photography images is best achieved with your wide angle lens. After capturing the morning light and views this morning, I opted for a telephoto lens to capture Otter Cliff in a more intimate photography image. Dawn light was in full swing and applying a split Neutral Density Filter diagonal along the coastline allowed me to capture the details of the cliff and trees while not blowing out the beautiful pink sky. The resulting longer exposure time also created a somewhat Silky Water Effect of the Atlantic Ocean in the picture.

Aperture at f/16, combined with an ISO100 setting provided a 1 second exposure time. During post processing I slightly adjusted contrast, lighting, and color saturation before sharpening this final Otter Cliff Seacoast Photography image.

Sep 9, 2012

Das Foto of the Week

Every week I choose one of my favorite photographs of the week from my Fine Art landscape, cityscape, flower and macro photography collection and offer it throughout that week at a discounted rate. This week's photo of the week on sale is The Wanderer displaying beautiful Monarch butterfly close up photography artwork from the Mass Audubon Broad Meadow Brook Conservation Center and Wildlife Sanctuary in Worcester, MA.

Starting today through the week of 24 September 2012 this Monarch butterfly insect macro photography image from my Butterfly Photography Gallery, available as art print, acrylic print, metal print or on canvas, is on sale.


Sep 7, 2012

Butterfly World ~ What a great Place to escape with a Camera!


A couple of weeks ago we visited Delray Beach in Southeast Florida. My family from Germany was visiting and we joined them for a week at the beautiful Parliament Inn. We had a wonderful time and it was great catching up on things and just hanging out together. While everyone decided to take a speed boat ride in Miami I decided to opt for a photo trip to the nearby Butterfly World in Coconut Creek. The butterfly garden was an amazing experience; what a great place to escape to with a camera. To see butterflies of every type and color flattering around the beautiful aviary was simply a joy. I spent about 3 hours pursuing macro photography. I first started out using my macro lens but ran into limitations of composing images and creating frame filling butterfly photos since the butterflies took off when I got too close. The 70-200mm lens came in handier and adding a 1.4x teleconverter made it a more pleasant photo experience at up to 420 mm focal length. In order to compensate for the longer lens and its slower shutter speeds adjusting the ISO setting to 200 was a must. A large aperture setting (small f/stop) not only supported faster shutter speeds but also created a shallower Depth of Field which is mostly desired when photographing wildlife, birds or bugs. Unfortunately Butterfly World does not allow the use of tripods or monopods. Kathy, a knowledgeable and most friendly worker at Butterfly World, pointed out to me that the watering system is very delicate and in earlier years when photographers were allowed to bring in tripods they broke a lot of water system piping by setting up tripods behind the railing. Hence, tripods and monopods were forbidden at one point.
In the first butterfly picture the Birdwing Butterfly was beautifully hanging off a little shrub branch. Isolating and composing the subject on the branch against a calming background was my highest priority. I therefore placed the butterfly in front of another bush that was probably 3 or 4 yards away and set a large aperture (small f-stop) of f/4.0 to obtain a sharp image of the butterfly with the calming backdrop in blur. An exposure time of 1/200 sec barely allowed me to hand-hold the camera. The second butterfly image shows a photo of a Madiera Butterfly sipping the sweet nectar of life. Aperture was f/4.5 at ISo200 resulting in an exposure time of 1/100 sec. The second butterfly photos was purposely underexposed by 1/3 of a stop to boost and saturate colors. Dust spot removal, minimal contrast, lighting and color saturation adjustments were made during post processing before sharpening the final images of the Butterflies.  

Sep 4, 2012

The Bramble Inn and Cape Cod Photography Memories


We spent this Labor Day weekend on Cape Cod and found peaceful accommodation at The Bramble Inn in Brewster. The Inn also has a restaurant where chef Ruth Manchester prepares the best steak, fish and deserts on Cape Cod. Once again this year it was voted the "Best restaurant on Cape Cod" by the 2012 Zagat guide. We settled for the delicious coffee and breakfast they serve and like to stay there because of its closeness to one of our favorite lakes on Cape Cod. The Inn is also close to Nickerson State Park and the Cape Cod bike trail. Nauset Beach and the National Seashore are just around the corner. Chatham with its buzzing gallery life and the outer Cape are just a short drive away. This time we left the bikes at home and instead decided to swim every day and take long walks on Nauset Light beach, Marconi Beach and Nauset Beach. I was able to snap some pictures of the beach and dunes during these walks and all in all it was a fantastic weekend to say good bye to the summer of 2012 … luckily we will have another opportunity to go back next week since I have to pick up my 2 Cape Cod photography images from “The Big Picture Photography Exhibit" on the Cape at the Cotuit Center for the Art, Sudbury River and Spiral Rose are ready for pick up at the Plymouth Center for the Arts … 2 birds with 1 stone.


Sep 1, 2012

Calla Lily won Second Place in BetterPhoto.com Photo Contest


Calla Lily won Second Place for July in the prestigious photography contest sponsored by BetterPhoto.com, the site's founder, Jim Miotke, announced Friday.

More than 11400 entries were submitted to the online photography contest, which attracted contestants from around the world and featured 10 separate categories.

The stunning abstract flower photography image of an orange calla lily garnered top honors after being submitted in the flowers category.

All of the winning images can be viewed at BetterPhoto.com's Contest Page. The contest is conducted each month. Categories include Nature and Landscapes, Animals, People, Elements of Design, Digital Darkroom, Travel and Place, Flowers, Details and Macro, Catch-All, and Monthly Theme. Judging is performed by a panel of professional photographers.

Besides its free, popular photo contest, BetterPhoto.com also offers a variety of services: digital camera reviews, online photo courses, free newsletters, a discussion forum, Web sites for photographers, question-and-answer section, how-to articles, photo galleries, and more.